Macintosh programming in Filemaker and C++.

The following text describes some tinkering, which could damage your Macintosh. If you want to do this yourself, it is entirely at your own risk. If you are not certain you can do it, don't even think about it. However, it is safe to read this text without counselling. You might even find it educational.
It will cover in depth all there is to know about serial ports, audio ports, video ports, the ADB bus. It will also feature several D.I.Y. projects that employ these vital Macintosh connections to the world.
All this material is ©1996 Troi Automatisering, Alphen a/d
Rijn, Holland.No parts of this text may be reproduced or copied in
any form without our written permission.
Great fun Spoiled
One of the greatest fun things to do with a Mac (and easiest
as well) is to record sounds. Especially with a Powerbook. I don't
want to criticise Apple, but on the first Powerbooks with PowerPC,
the Powerbook 5300, they have omitted a few things too much.
The Powerbook 5300 is only supplied with a line-level audio input. There is no way to connect either a normal non-amplified microphone or a plaintalk microphone to the Mac. And what's worse, is that it would have cost less than a dollar to implement this. So you are stuck with the built-in microphone.
The power to record
But there is a relatively simple solution if you already own
a Plaintalk microphone . This microphone is
specially designed for a desktop PowerMac. It has a built-in
amplifier and a special long audio jack (see fig 1), which fits
nicely in the audio input of your desktop PowerMac. Because this jack
is longer it can tap 5 volt to supply the amplifier of the
microphone.


Get your own voltage
By using the 5 volt from the ADB port we can get the Plaintalk
microphone to work. For this you need only a few things. Read through
the description first, you may not need everything.
Shopping list:
How to cheat
What you need to do is the following:
1- Cut the cable
For this you may need some courage: cut the cable in two. Do this at
a place not too close to the jack, because this is the only jack you
have, and soldering the thin wires is not too easy. I cut it about 20
cm from the jack.
If you cut it closer to the microphone you end up with a shorter
cable and you may have to lengthen it.
2- Solder the cable back again
If you want to continue using the Plaintalk microphone on your
desktop Mac you need a way to switch the plugs. For this you need the
connectors. You can use any connectors you find handy and can find.
The only thing needed is that they have a least 3 pins. I used a
mini-din 3 pins male and female connector but you could also use an
audio jack, but be careful not to mix them up with the normal
plug.
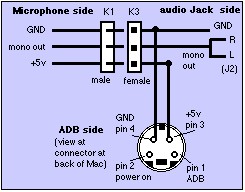
See figure 3: solder the 3 wires attached to the microphone to the male connector (K1), and solder the 3 wires attached to the jack plug to the female connector (K2). Make sure, by checking the colours, that the same wires are connected when you plug the new connectors.
By now you are as far as you were before you started: You should again be able to use it for your Desktop PowerMac. Check this out first.

3- Now solder the power tap
Connect a 2 wire cable of a few centimetres length to pin 4
(GND) and pin 3 (+5V) of the ADB bus, as indicated in figure 4. For
this you can use a male MiniDin plug (4 pins). If you want to
continue to be able to use the ADB port you can also connect a female
connector to the corresponding pins of the male connector.

Connect he other end to K3, a 3 pins female connector. See figure 4. Also connect the normal audio Jack plug J2 with a few centimetres of cable to to K3. You can connect both Right and Left to Mono out, because the Plaintalk microphone is mono only. Test your newly created cables, and check if it isn't shorted somewhere. If you are sure, connect it up to your Mac and give it a go. Great sound should be available now. Good Luck!

For information about this home-page and suggestions please
e-mail:
©1996, Troi Automatisering, Alphen a/d Rijn, Holland.